- Aperture
- The focal length of your camera lens
- Sensor size
- Focus Distance (Distance between the subject and camera)
1) Aperture :
- The lower f-number = Shallow Depth of field.
- Higher f-number = Deeper Depth of Field.
- Lower f-number + Higher Shutter Speed = Shallow Depth of Field
- Higher f-number + Lower Shutter Speed = Deeper Depth of Field

2) Focal length of your camera lens :
- Longer focal length = Shallow Depth of Field.
- Shorter focal length = Deeper Depth of Field.
3) Sensor size :
Sensor size also affects Depth of Field. In this case, the equation will be:
- Larger Sensor (Full-frame sensor ) = Shallow Depth of Field.
- Smaller Sensor (crop frame sensor) = Deeper Depth of Field.
Full-frame (FF) or 35mm DSLR has been the standard when it comes to creating the lovely shallow DOF look, which is why they are often the preferred choice for professional photographers.
4) Focus Distance (Distance between the subject and camera) :
- Shorter the distance = Shallow Depth of Field.
- Longer the distance = Deeper Depth of Field.
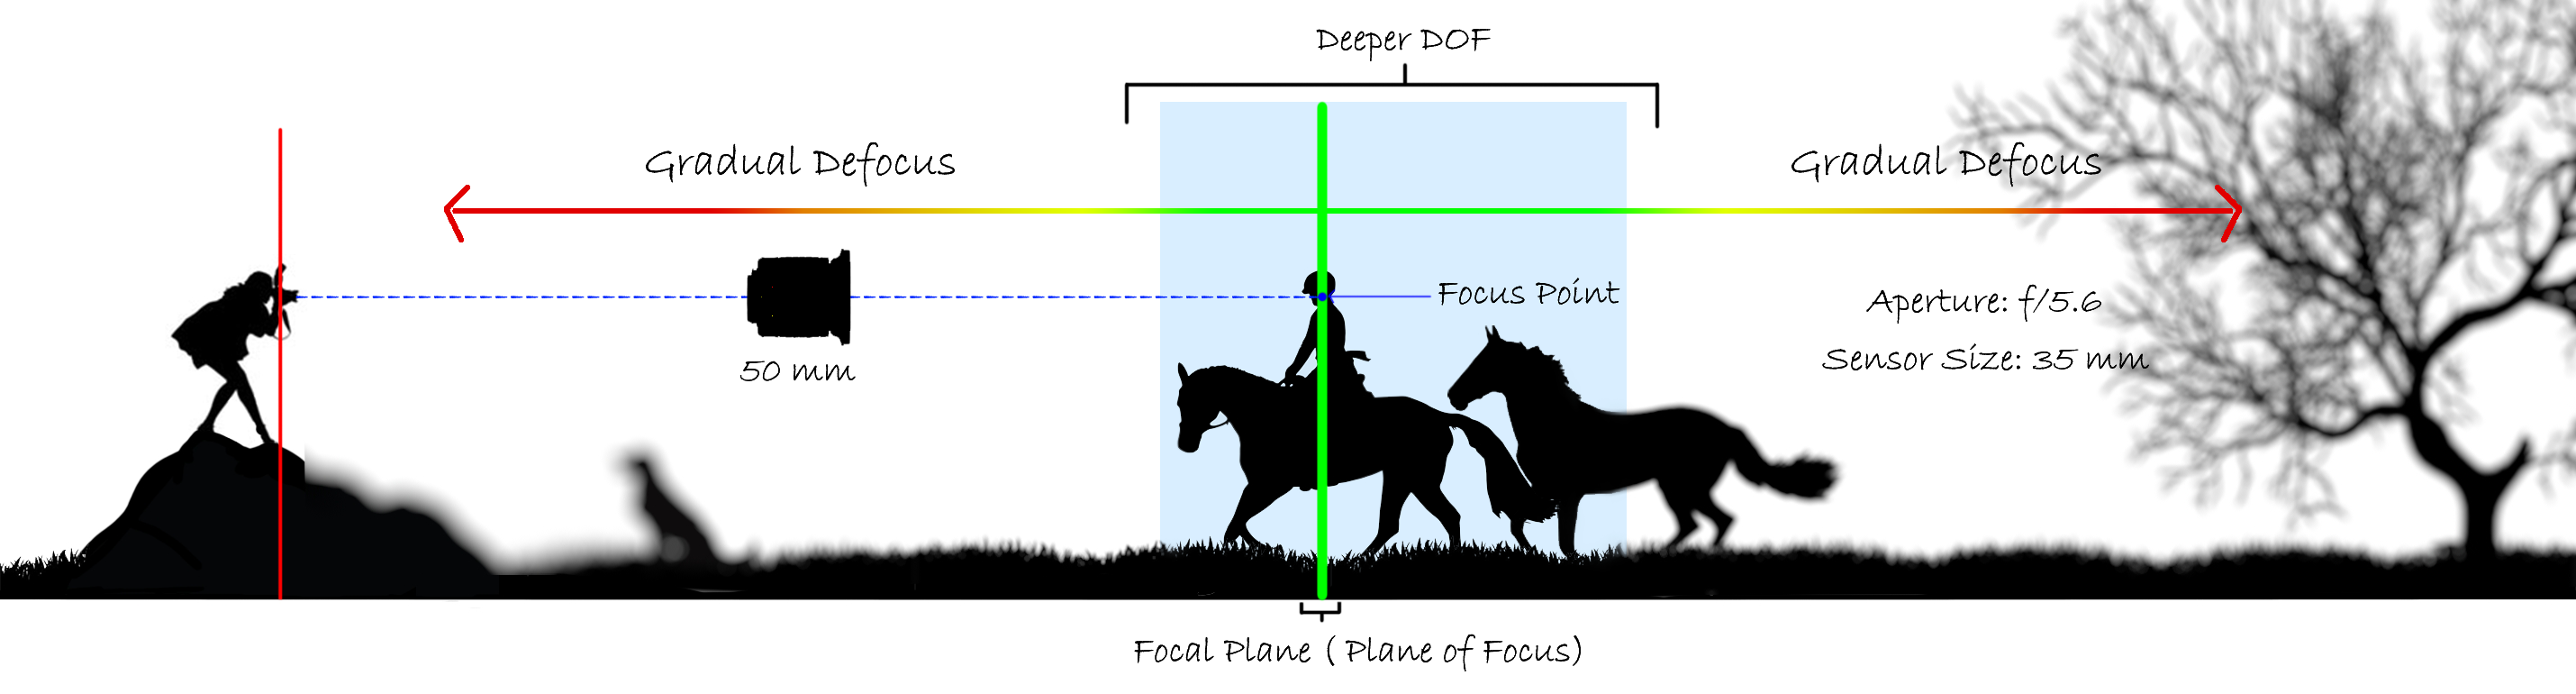
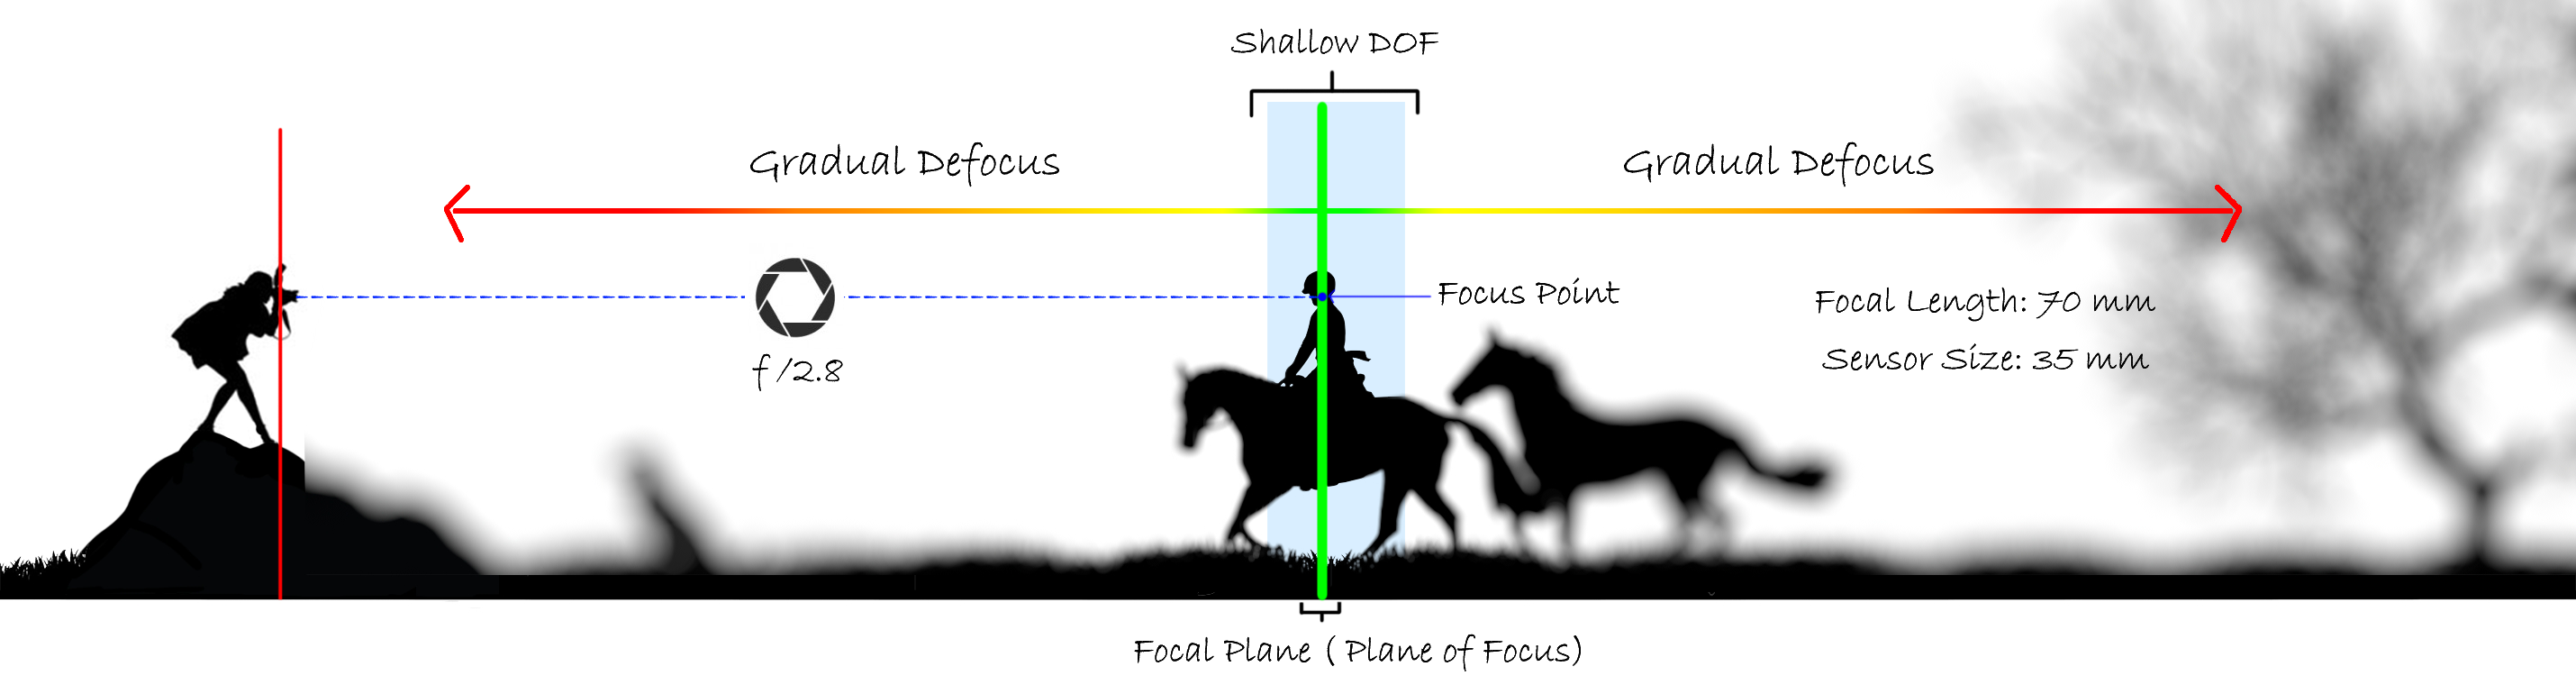
Defocus Graph :
- f/5.6, f/2.8
- 50 mm, 200 mm
Example 1 :
Move the slider below to compare
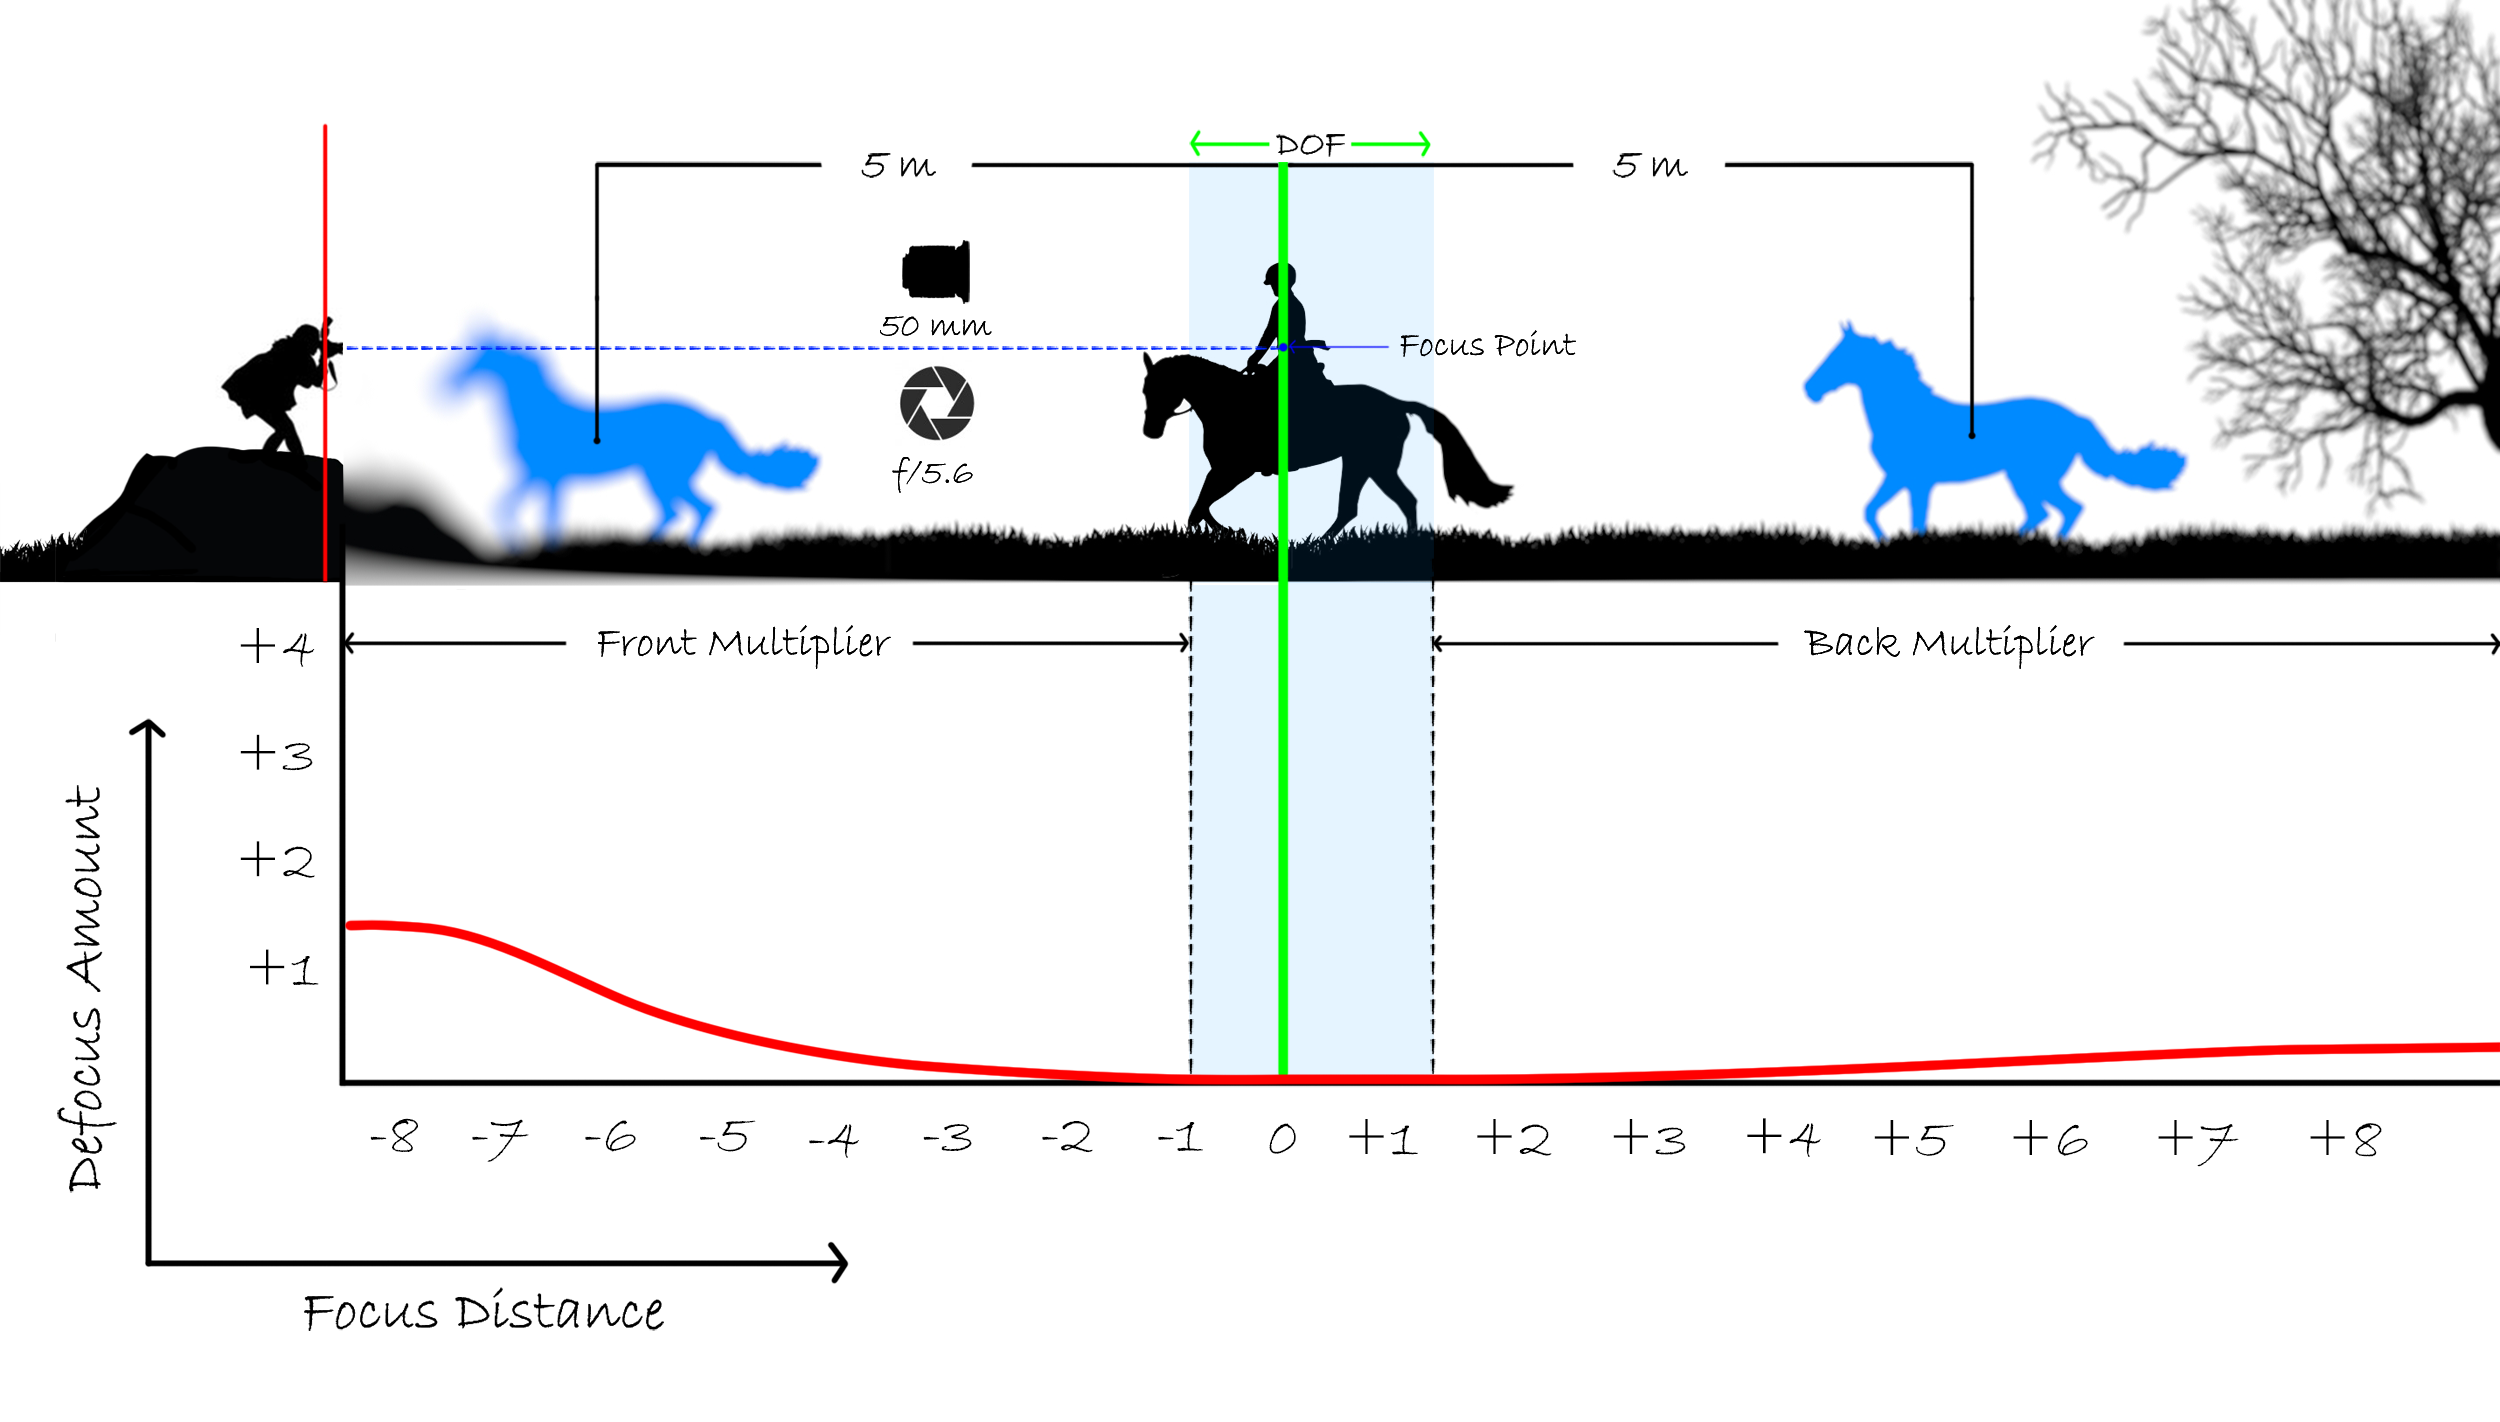
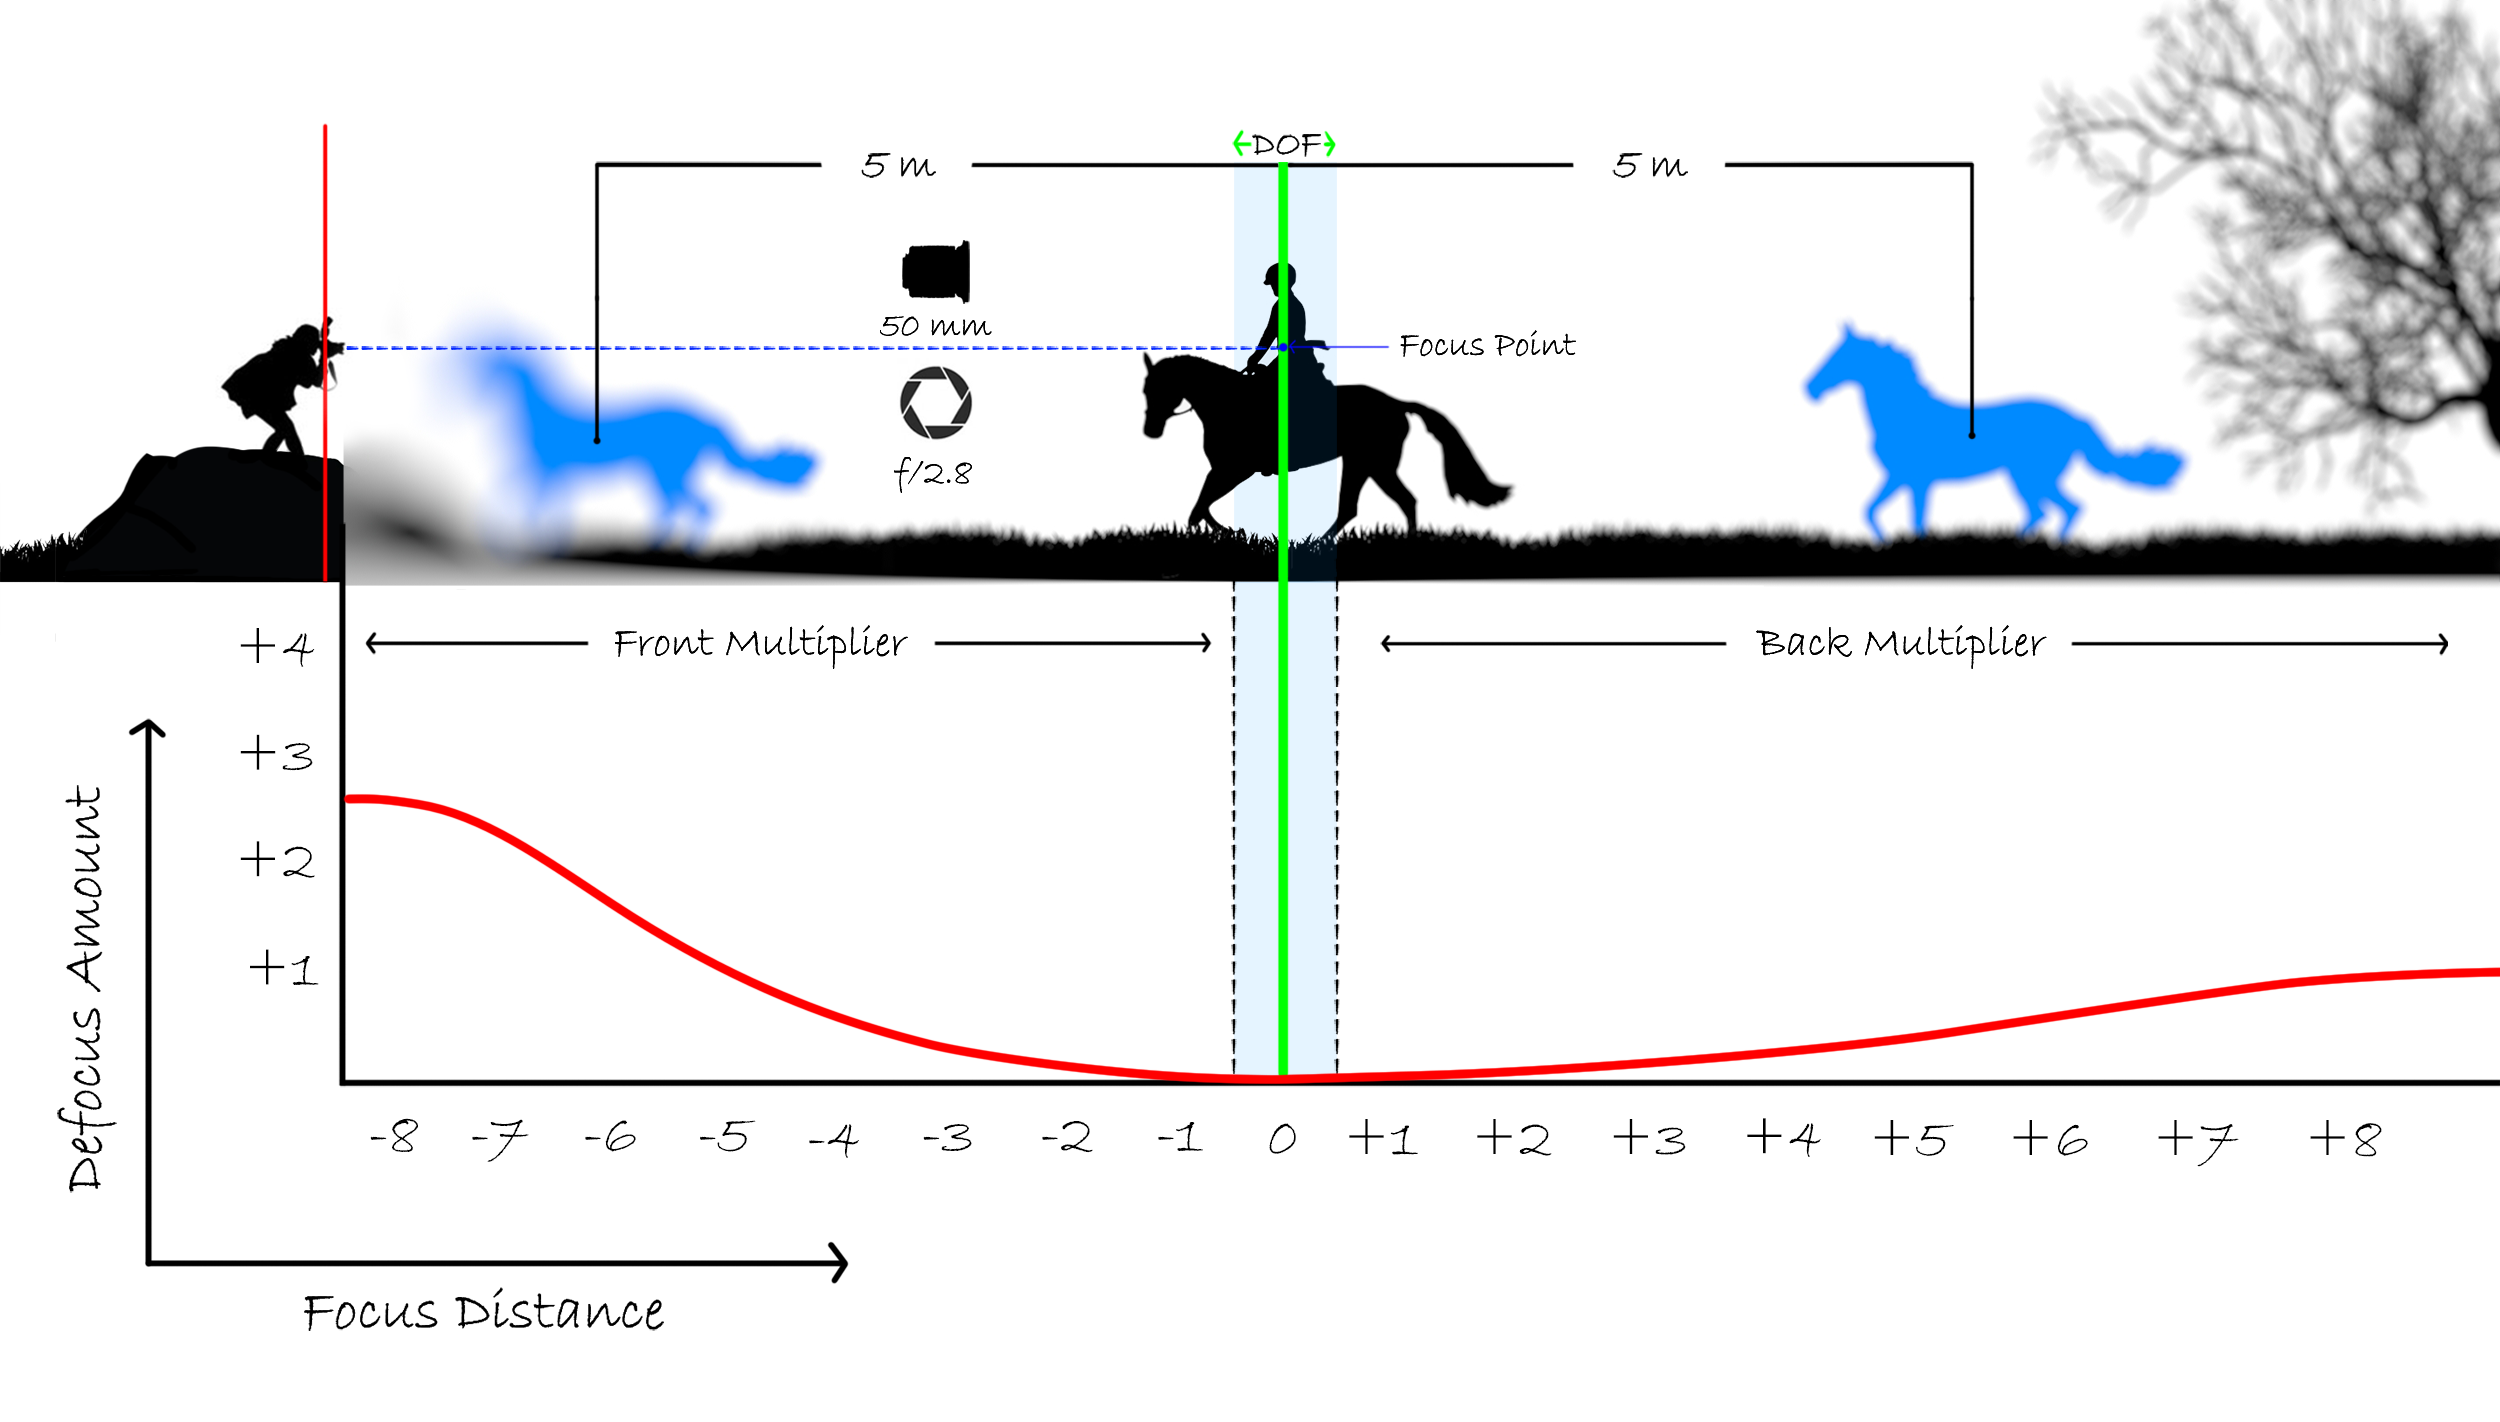
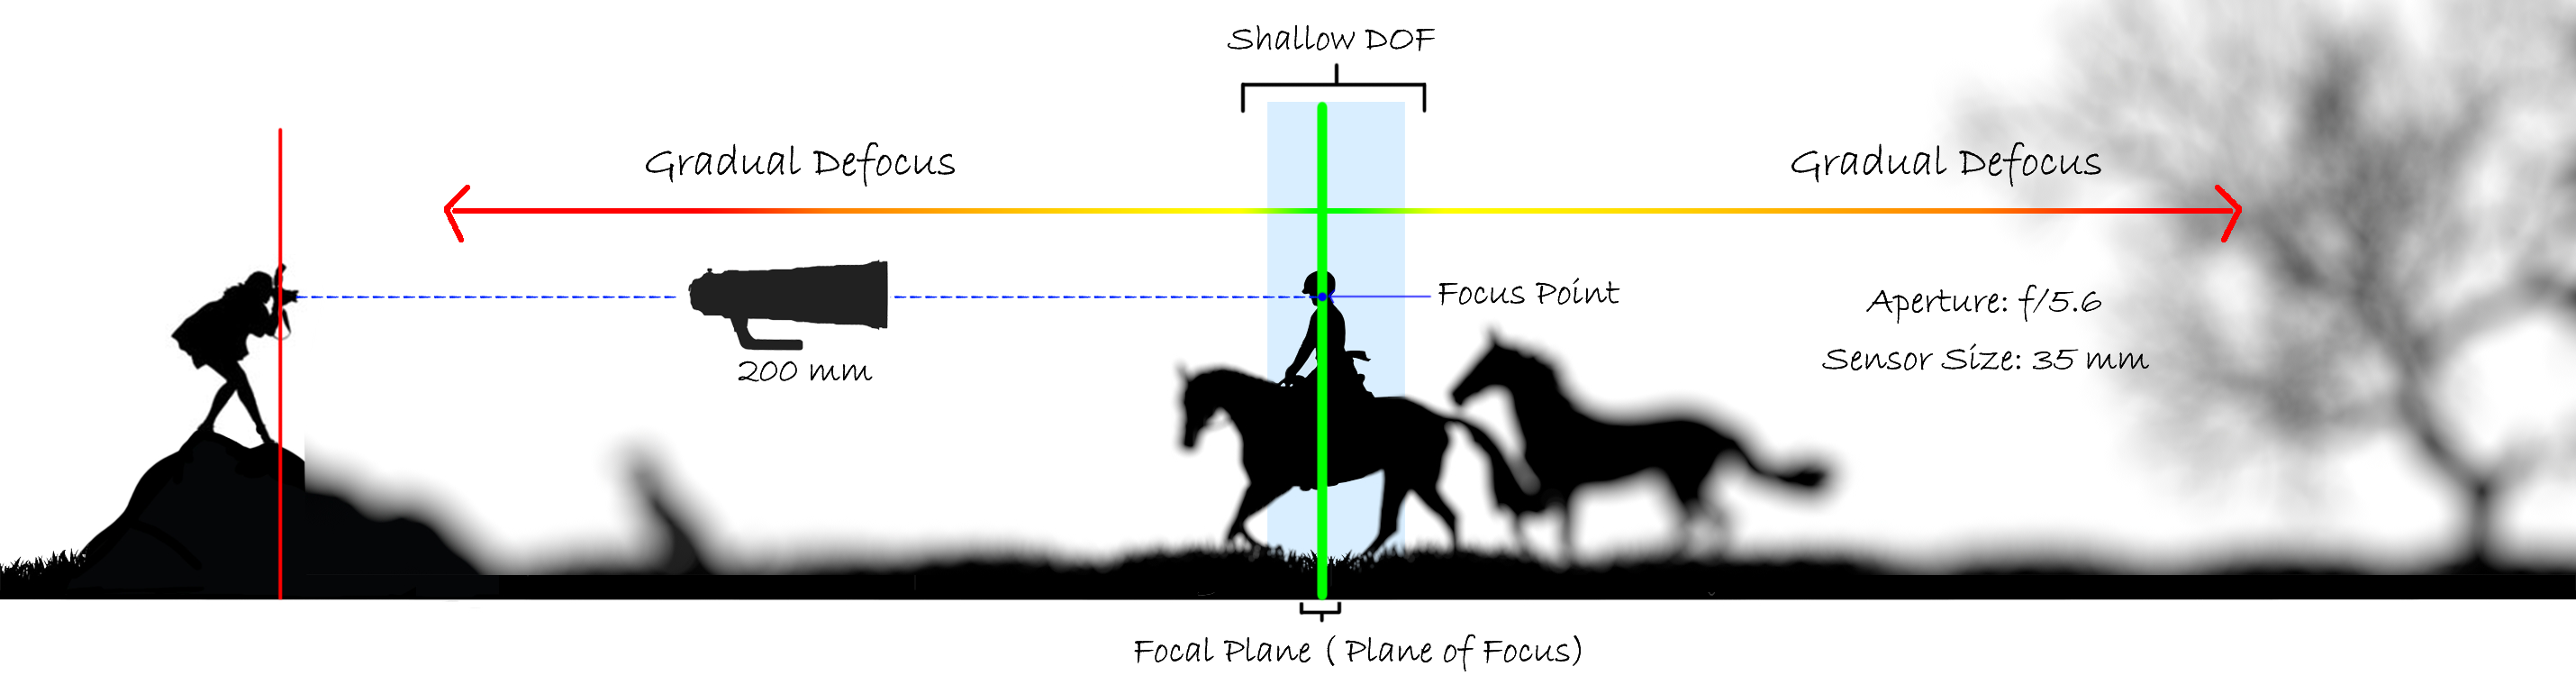
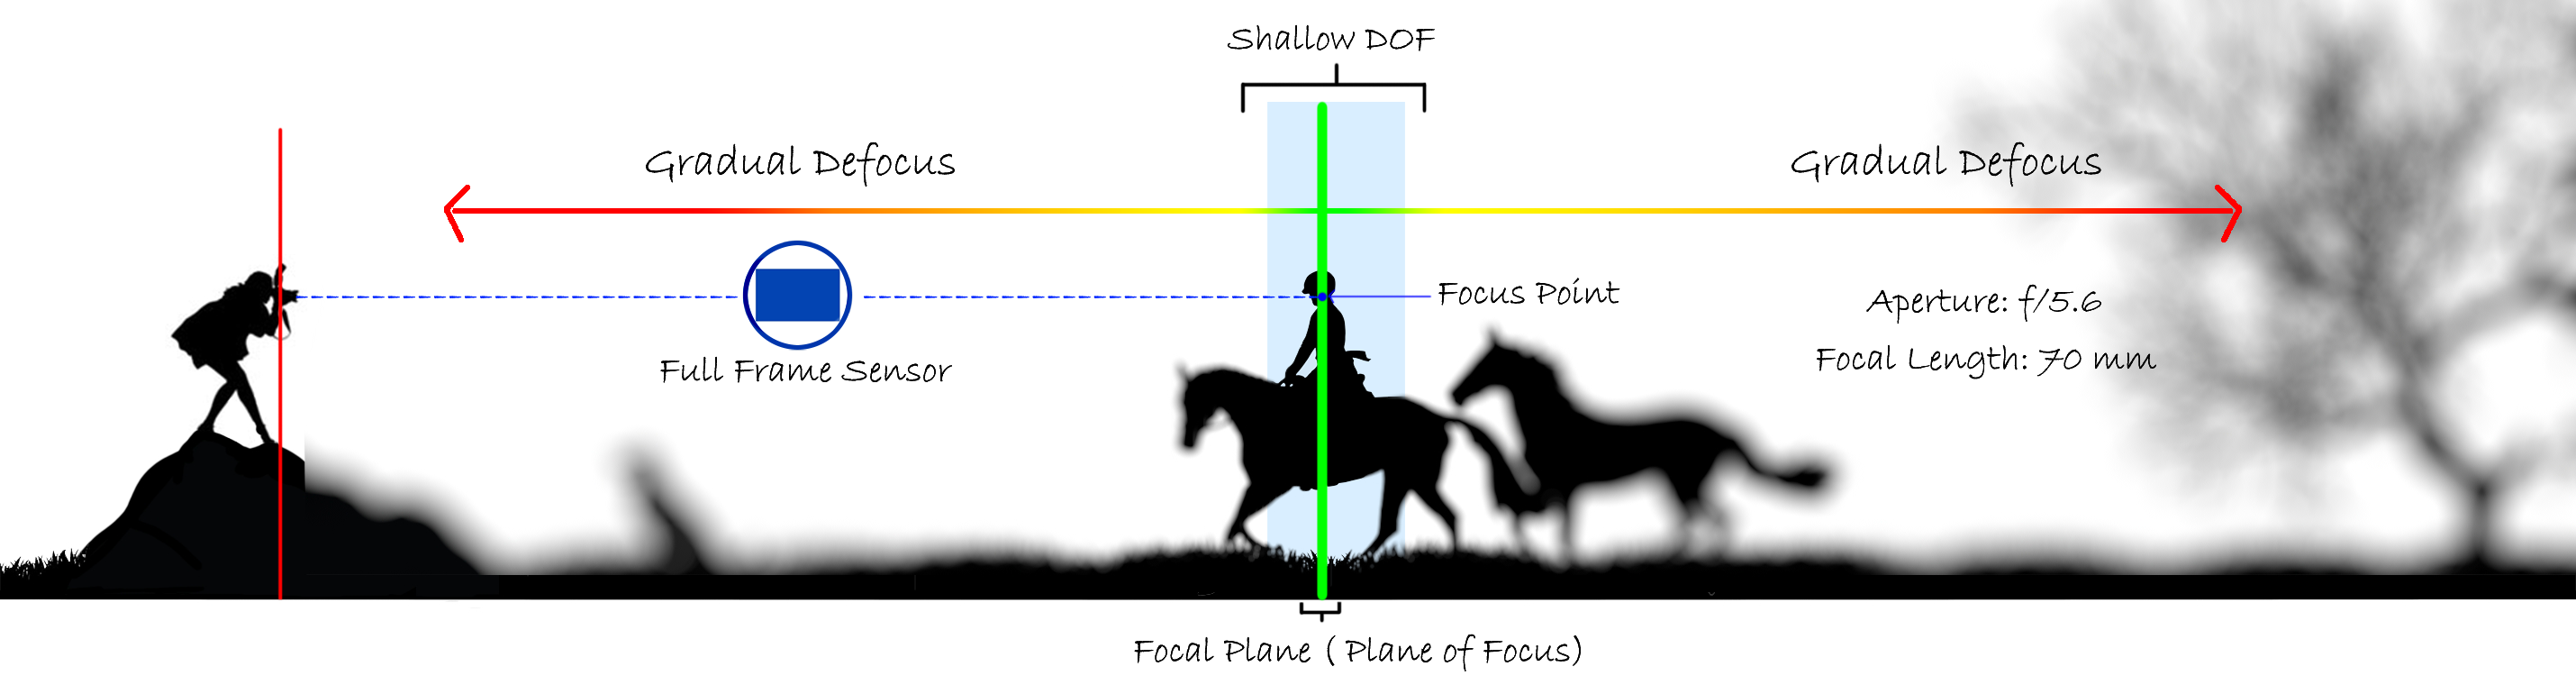
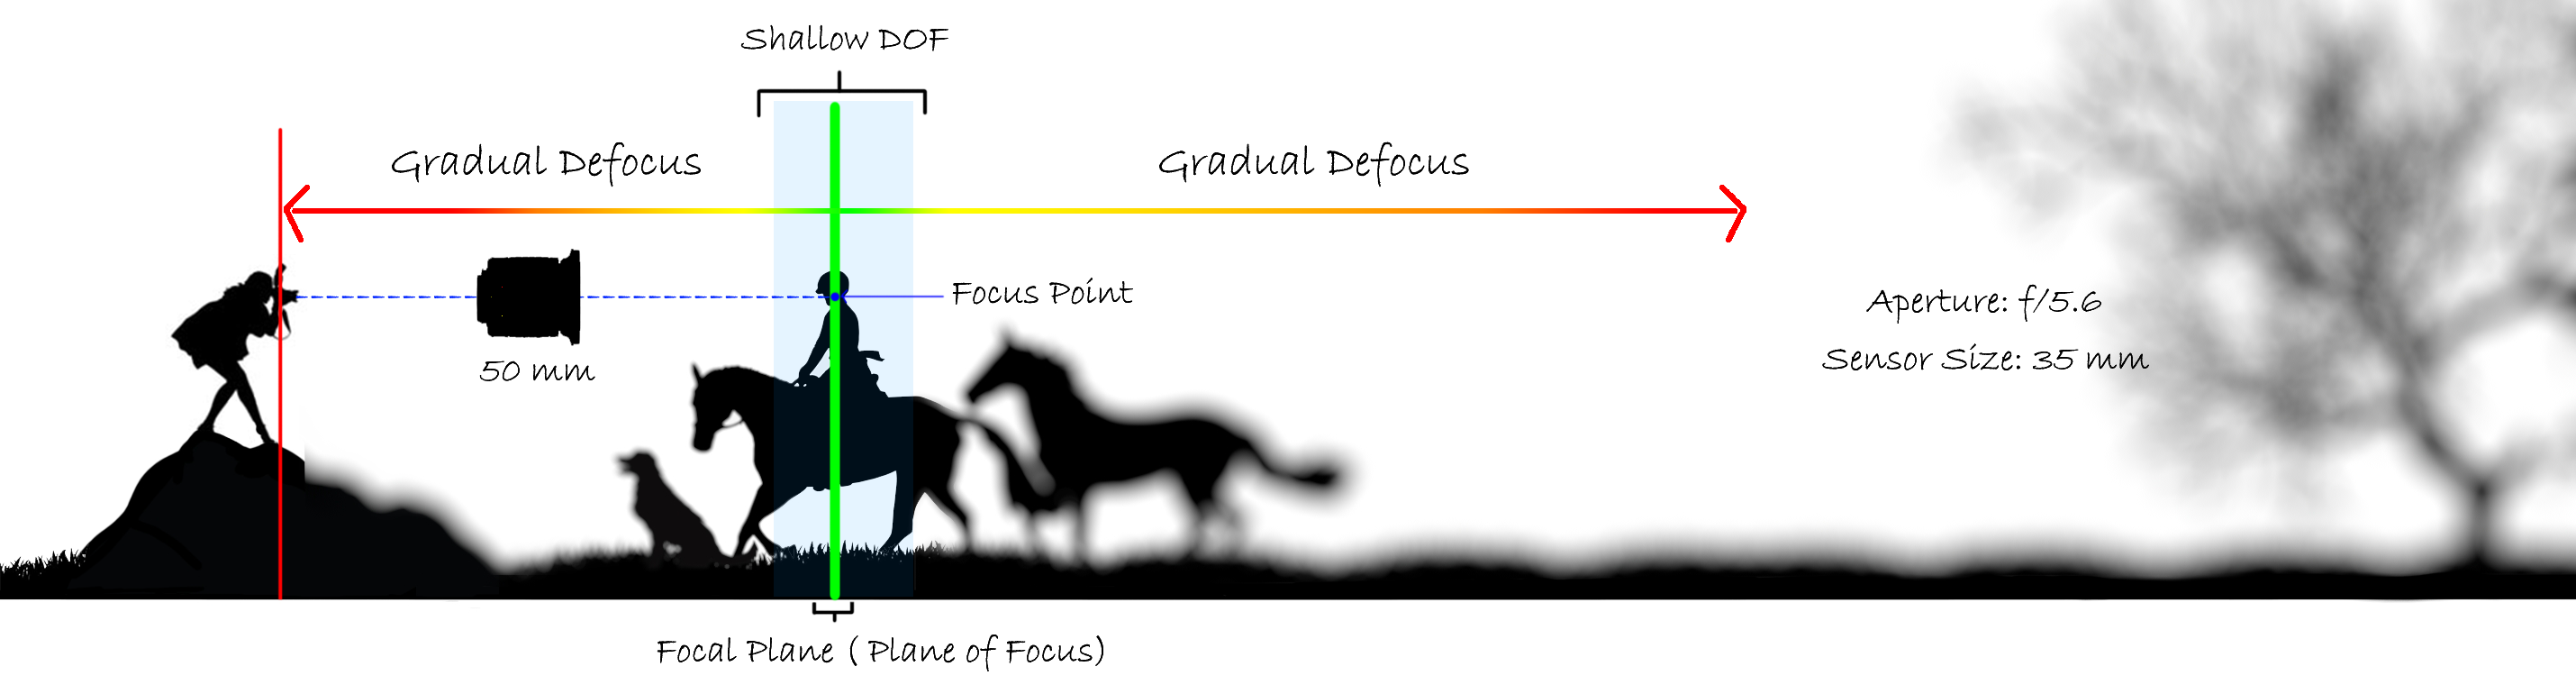
Example 2 :
In this example, we will keep the Aperture f/5.6 and change the Focal Length between 50 mm to 200 mm to understand the nature of Defocus on both sides of DOF.
Move the slider below to compare
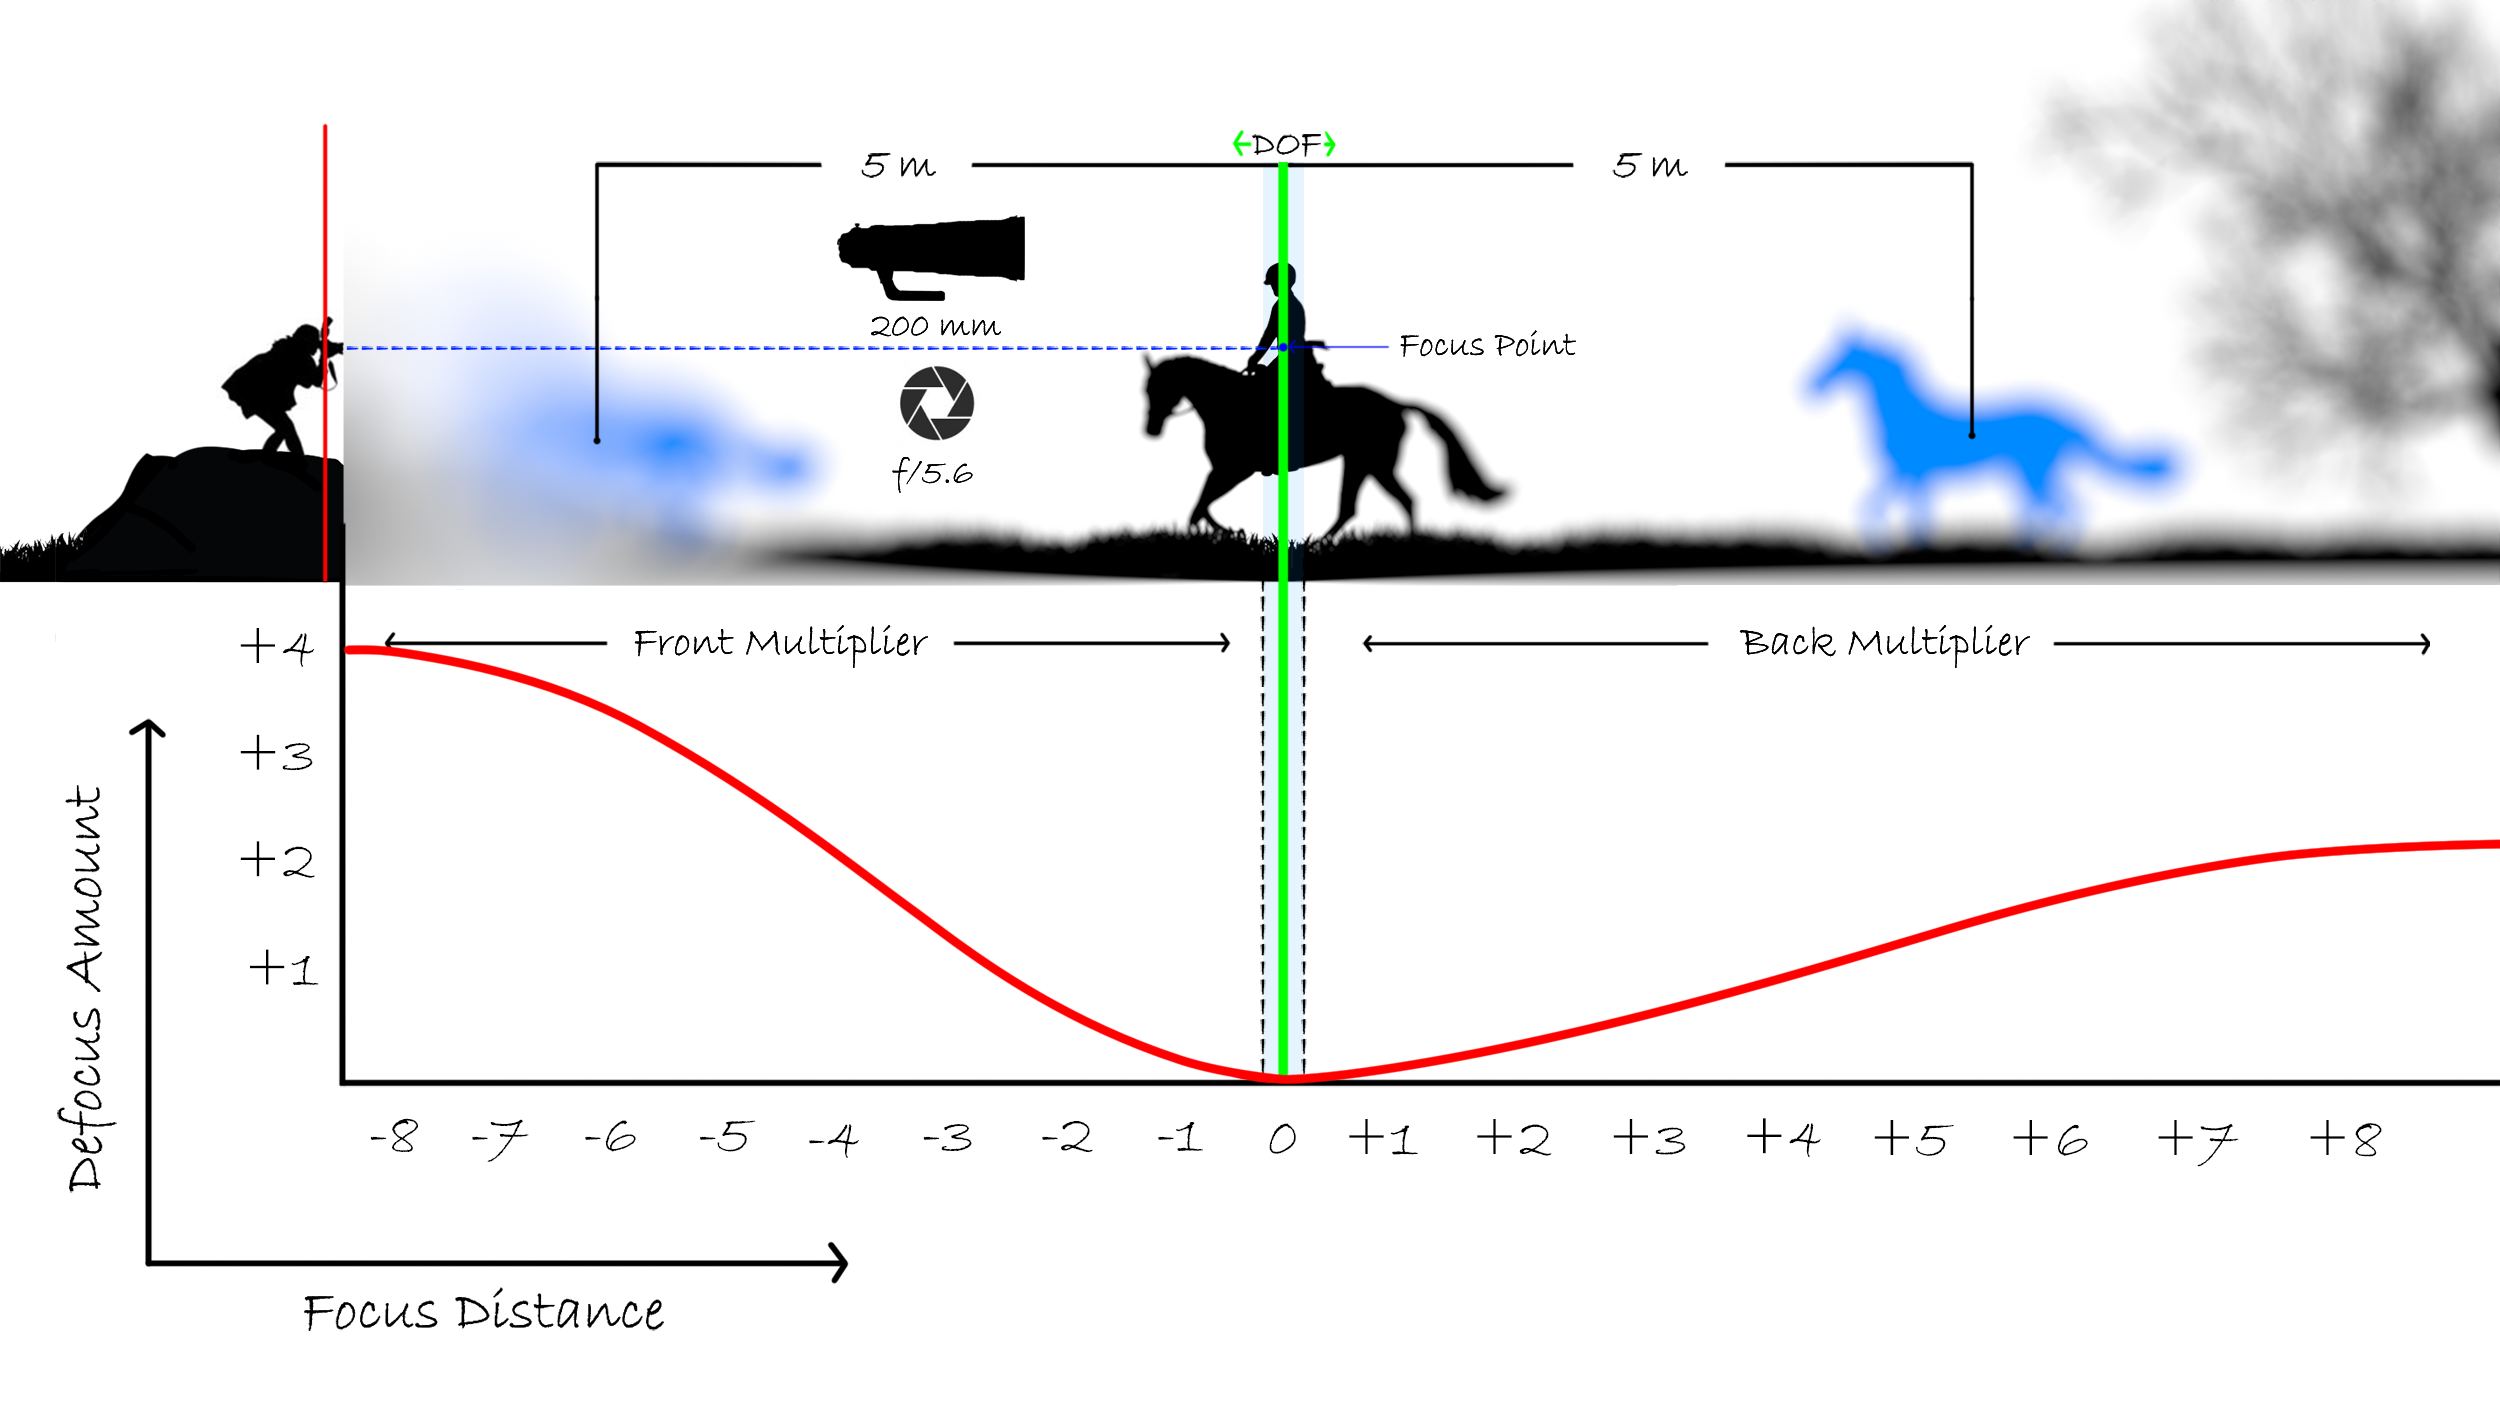
One important point to notice is at the end of the curve ( red curve ) on both sides of the Focal Plane. The Defocus amount does not increase continuously over distance. After a certain distance, once Defocus amount reaches its highest point the value increases very very slowly (visually negligible) and the graph becomes almost steady.
Now, I think you have a solid understanding of Depth of Field. And why f/2.8 Aperture with 200 mm lens is one of the favorites among portrait photographers. Because when you combine a wide Aperture with a Long Focal Length you can able utilize the best of both worlds.

FAQ
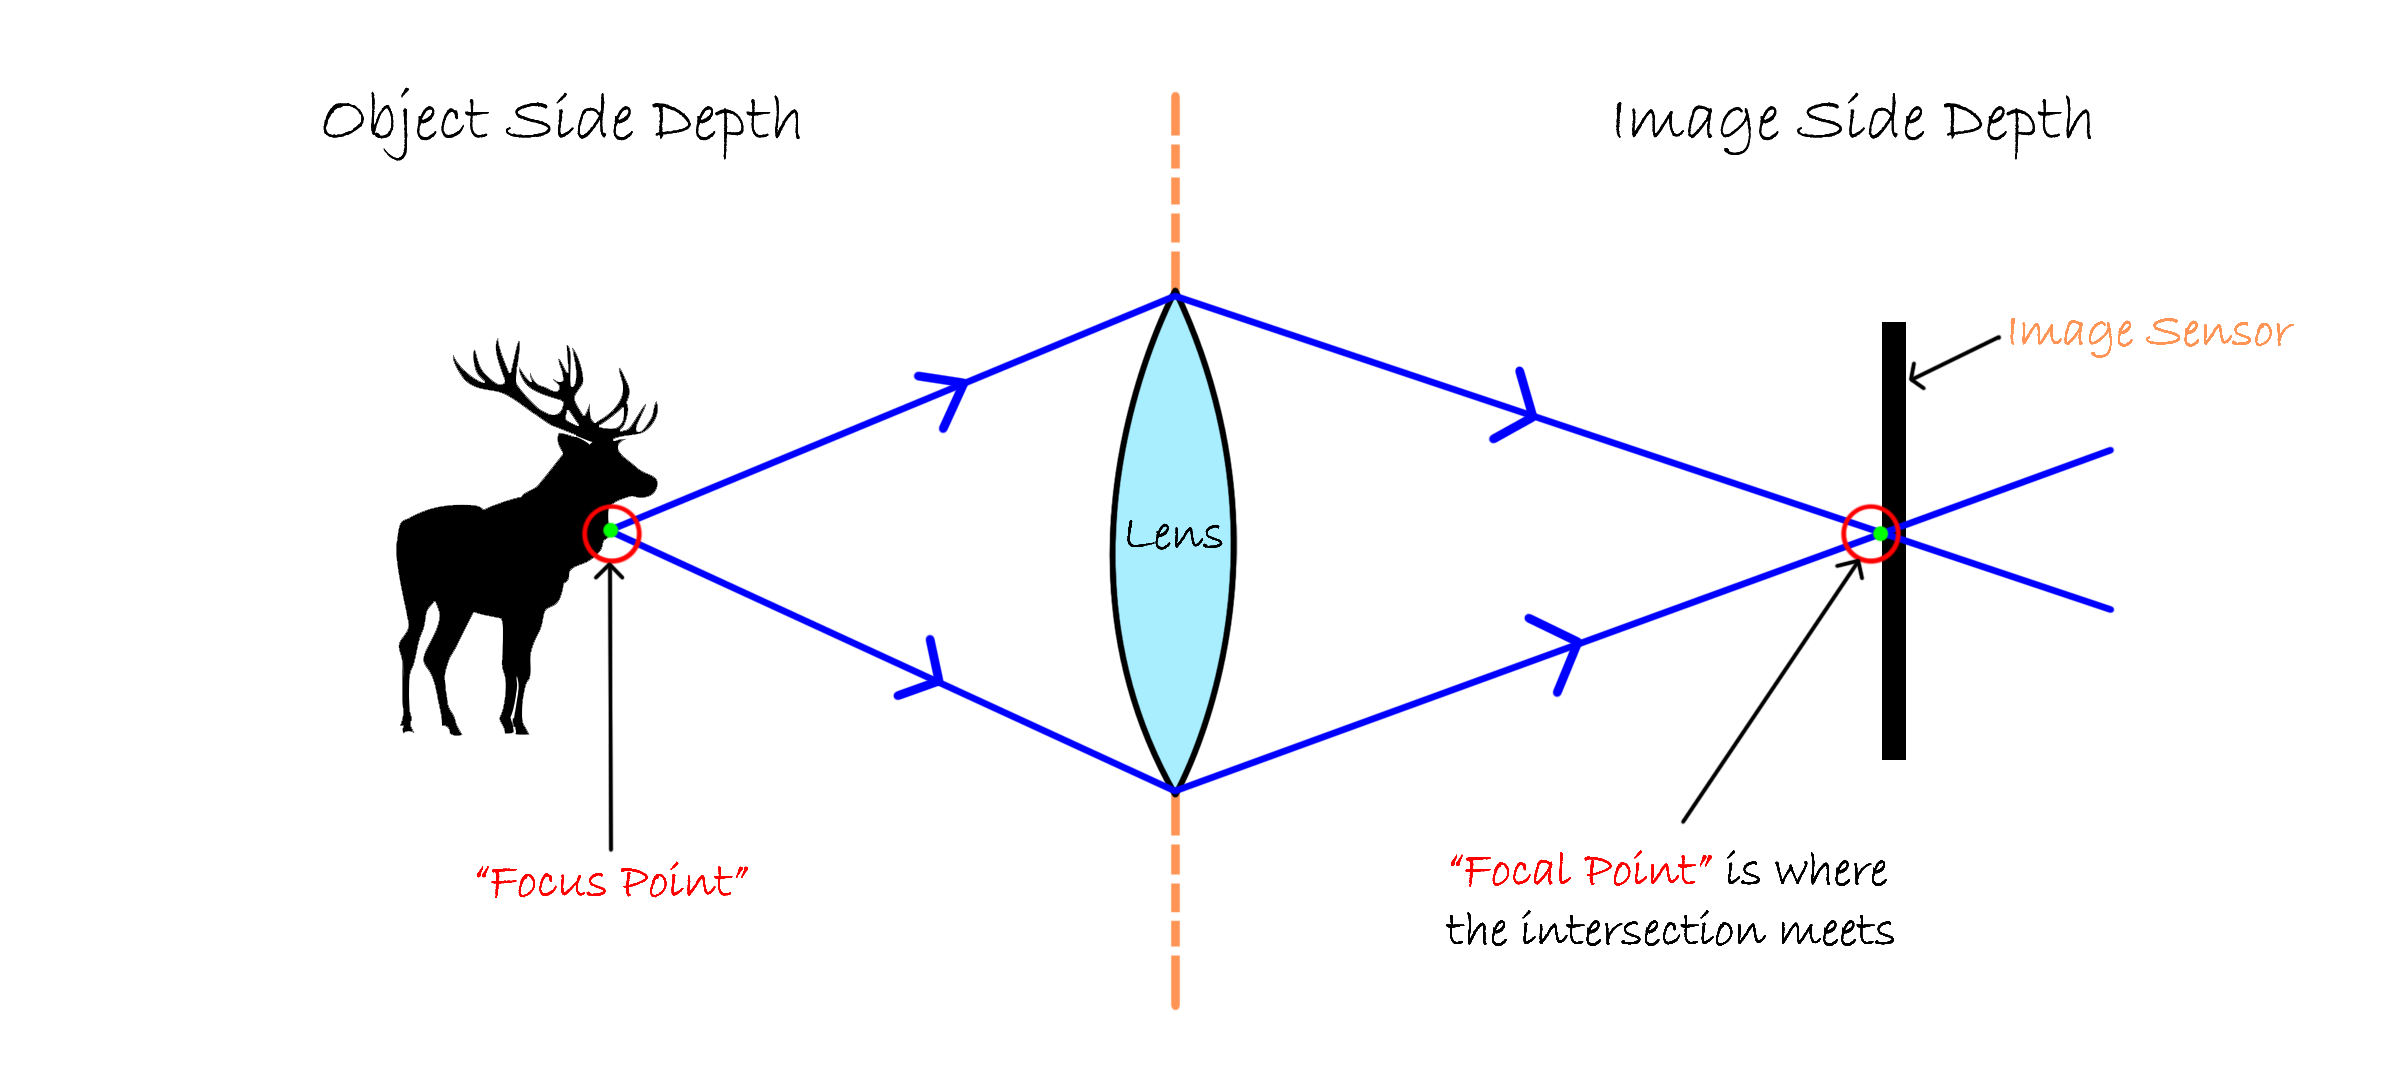
What is the difference between Focus Point and Focal Point?
Focus Point and Focal Point are very often used interchangeably. But both are different techniques. To understand this concept, we can divide the light’s path into two sides with respect to the lens. The object-side depth(the actual scene you are shooting) and the image-side depth (inside the camera).
Focus Point – This is part of the object side depth. It is where you focus your subject. And the portion of your frame that will render at its sharpest.
Focal point – This is part of the image side depth. the light travels from the subject in a cone-like manner and converges at a certain point inside the camera sensor. The point where the light intersects at the sensor after it was projected by the lens is the Focal Point.
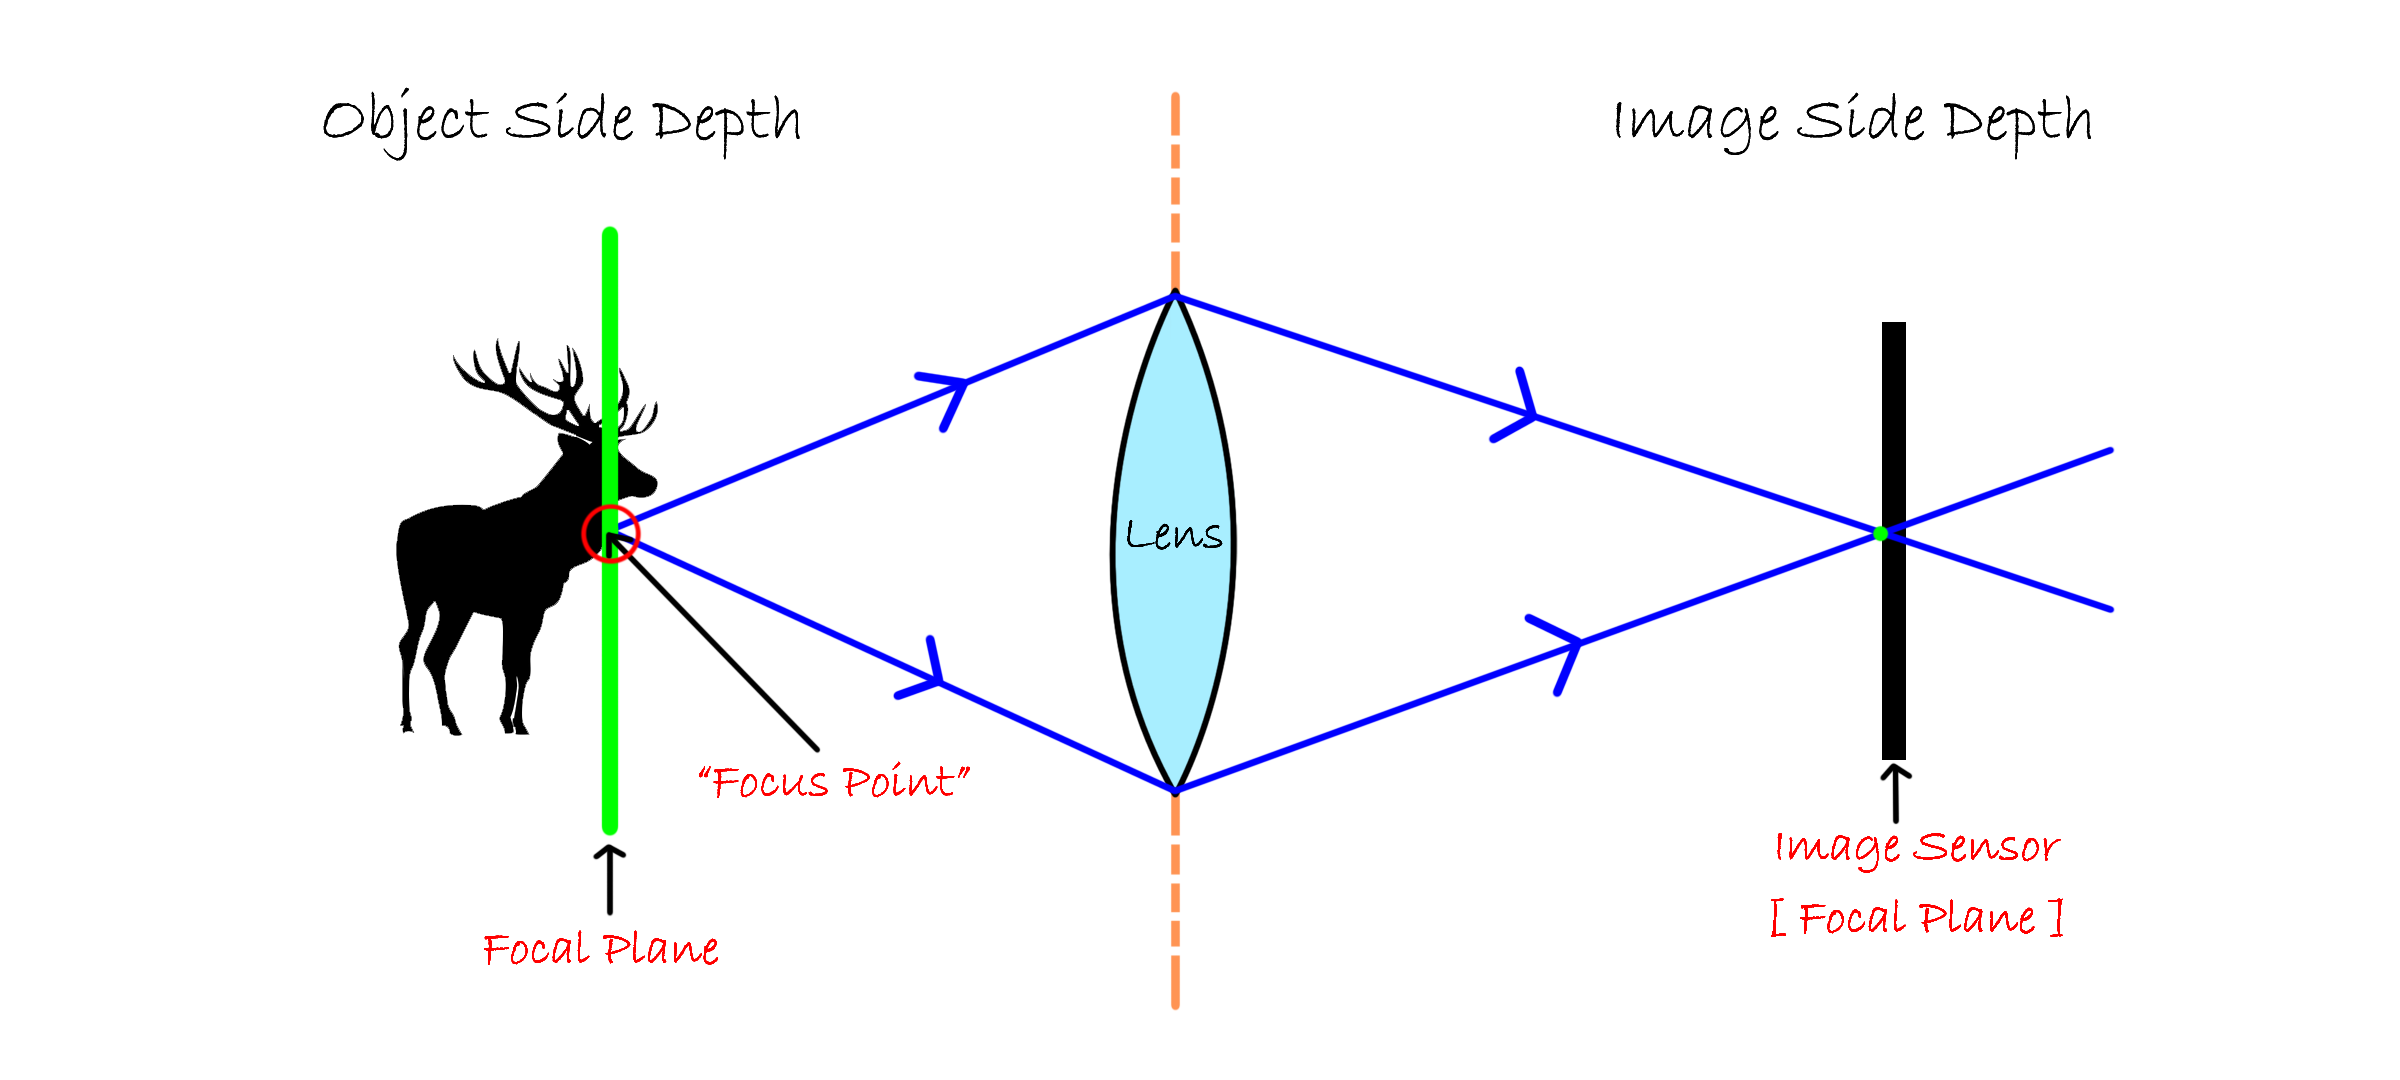
What exactly is the Focal Plane ?
Technically, the Image Sensor is the Focal Plane. But, It is very common for photographers to not address the technical in-camera focal plane at the sensor, but to instead refer to the focal plane that extends beyond the lens and away from the sensor- the focal plane on the outside of the camera.
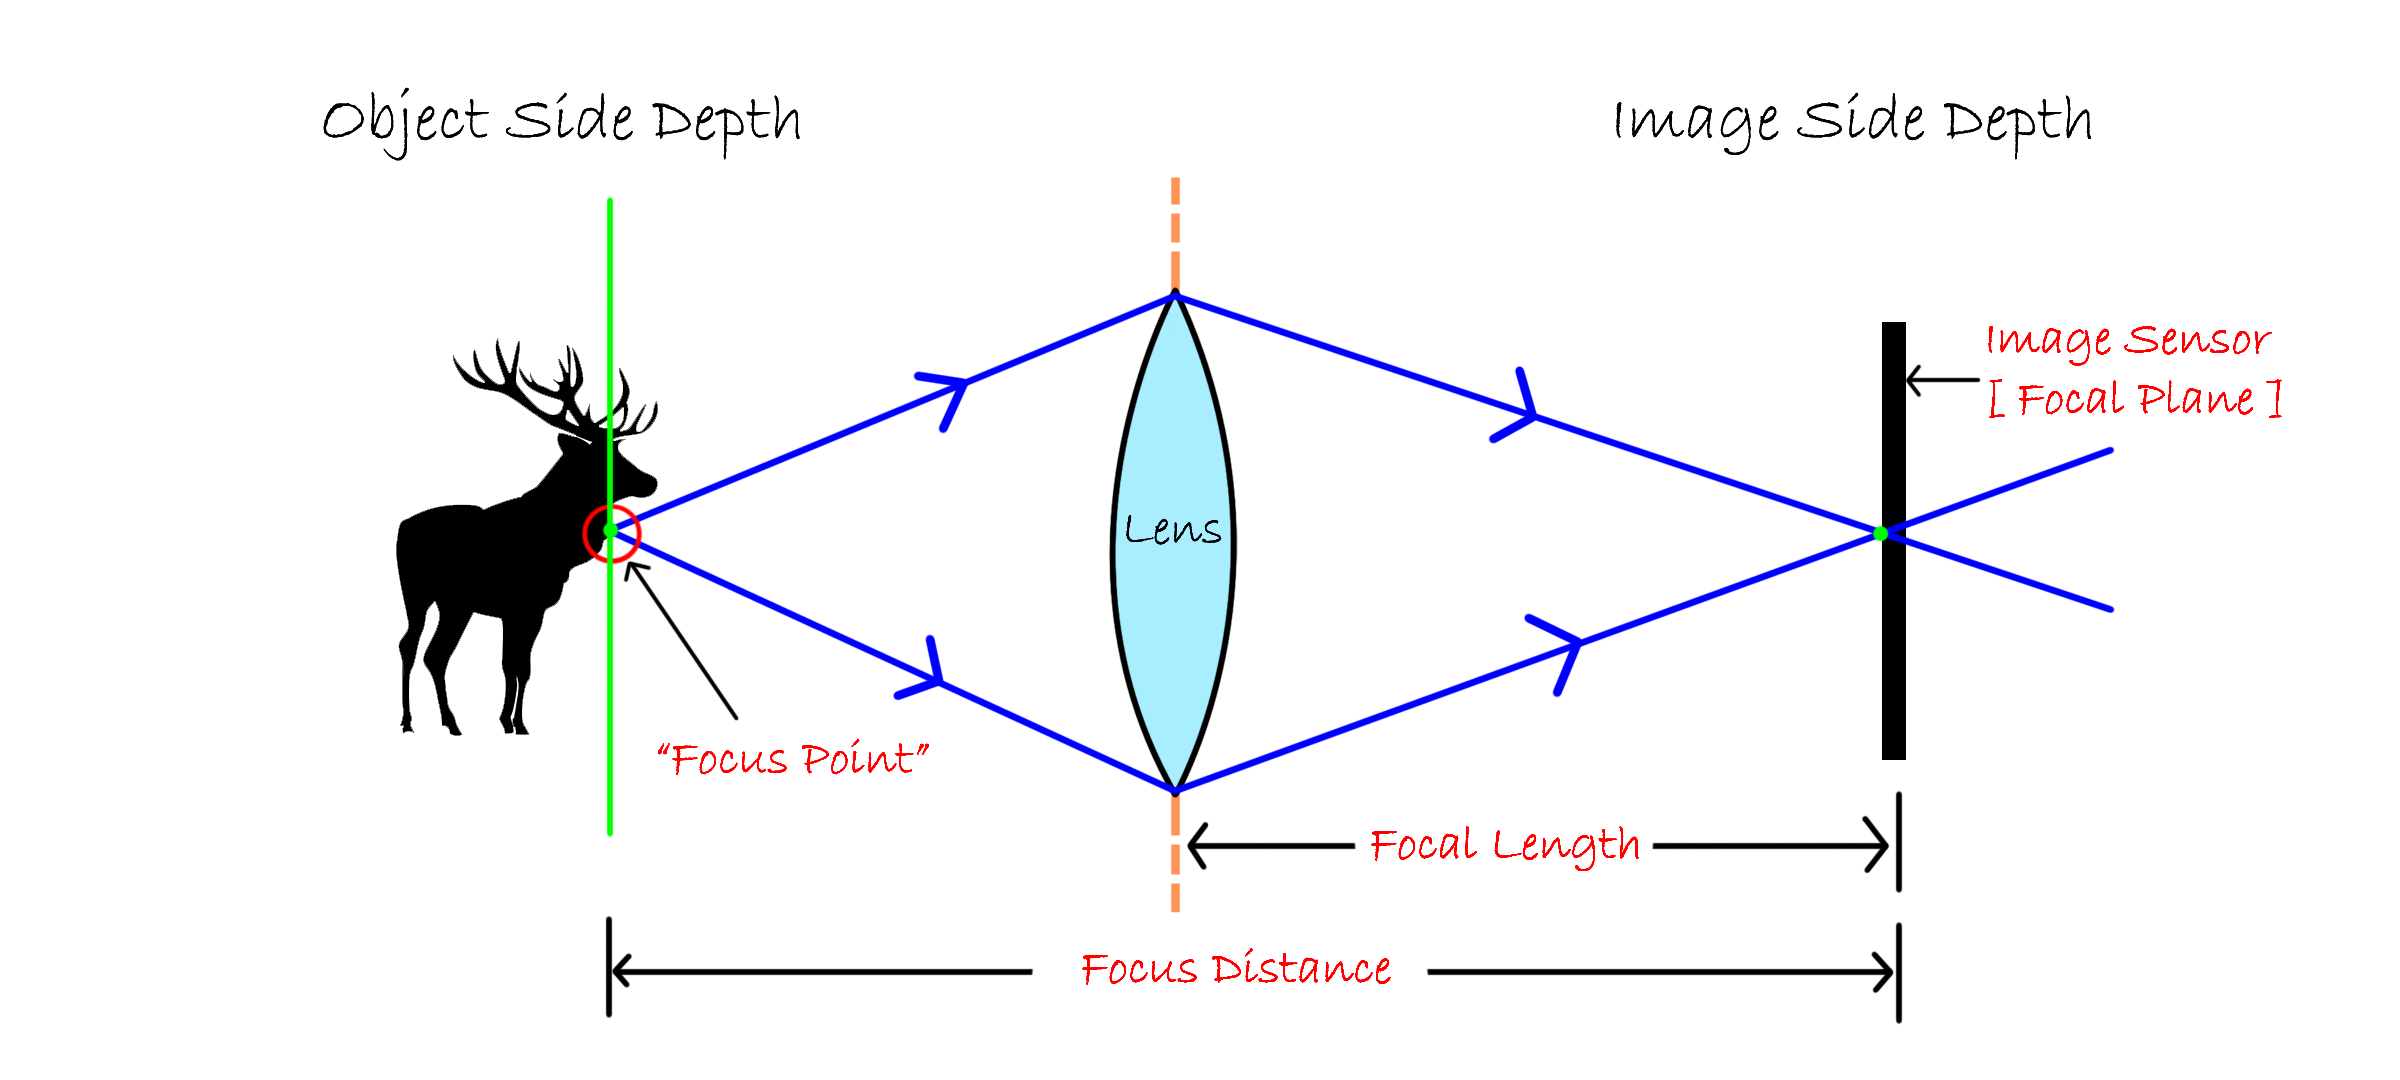
What is Focus Distance and Focal Length?
Focus Distance is the distance from the in-camera Focal Plane (Image Sensor) to the subject.
The focal length of the lens is the distance between the lens and the in-camera Focal Plane (Image Sensor).
What if I have a camera that does not allow a change in the Depth of Field?
Point and shoot cameras might not give you a setting that allows you to change your aperture. Similarly, they might have a fixed lens, where the focal length change comes from zooming into the scene.
There is still a way you can change and control your depth of field. By changing your setting to ‘portraits’ (human head symbol) you have access to a narrow depth of field. For a wider or deeper depth of field, choose the mountain icon.
iPhones or other smartphones choose the settings automatically, stopping you from choosing a specific aperture. This is unless you use a dedicated app to control settings for a wider or narrower depth of field.
One way to create a shallower depth of field is to move closer to your subject. This change in distance will push your background into a blur, only allowing your subject to focus.
How to take photographs of nearly everything in focus?
Solution 1: Hyperfocal Distance
That is a question that many, especially landscape photographers, face quite often. When you are photographing a landscape, have a nice foreground and background in the frame, and you want as much as possible in focus. The first thing that will come to your mind is to set a small aperture, typically ranging from f/8 to f/22, and you might focus on something very close at the risk of blurring the background. Or you can focus on something far away and risk blurring your foreground elements, to get a nice wide depth of field. But still, sometime you might not end up with everything acceptably sharp in your frame.
Then you might state thinking “where should I focus? What camera settings should I use now ?”
The trick is not to focus on either the foreground or the background. If you focus on the foreground, the background will go out of focus, and if you focus on a detail in the background, the foreground will be blurred. To make both come out sharp, you need to focus on them. This concept is called “Hyperfocal Distance”.
Hyperfocal distance is just the closest point at which you can focus and still keep the furthest edge of your background acceptably sharp.
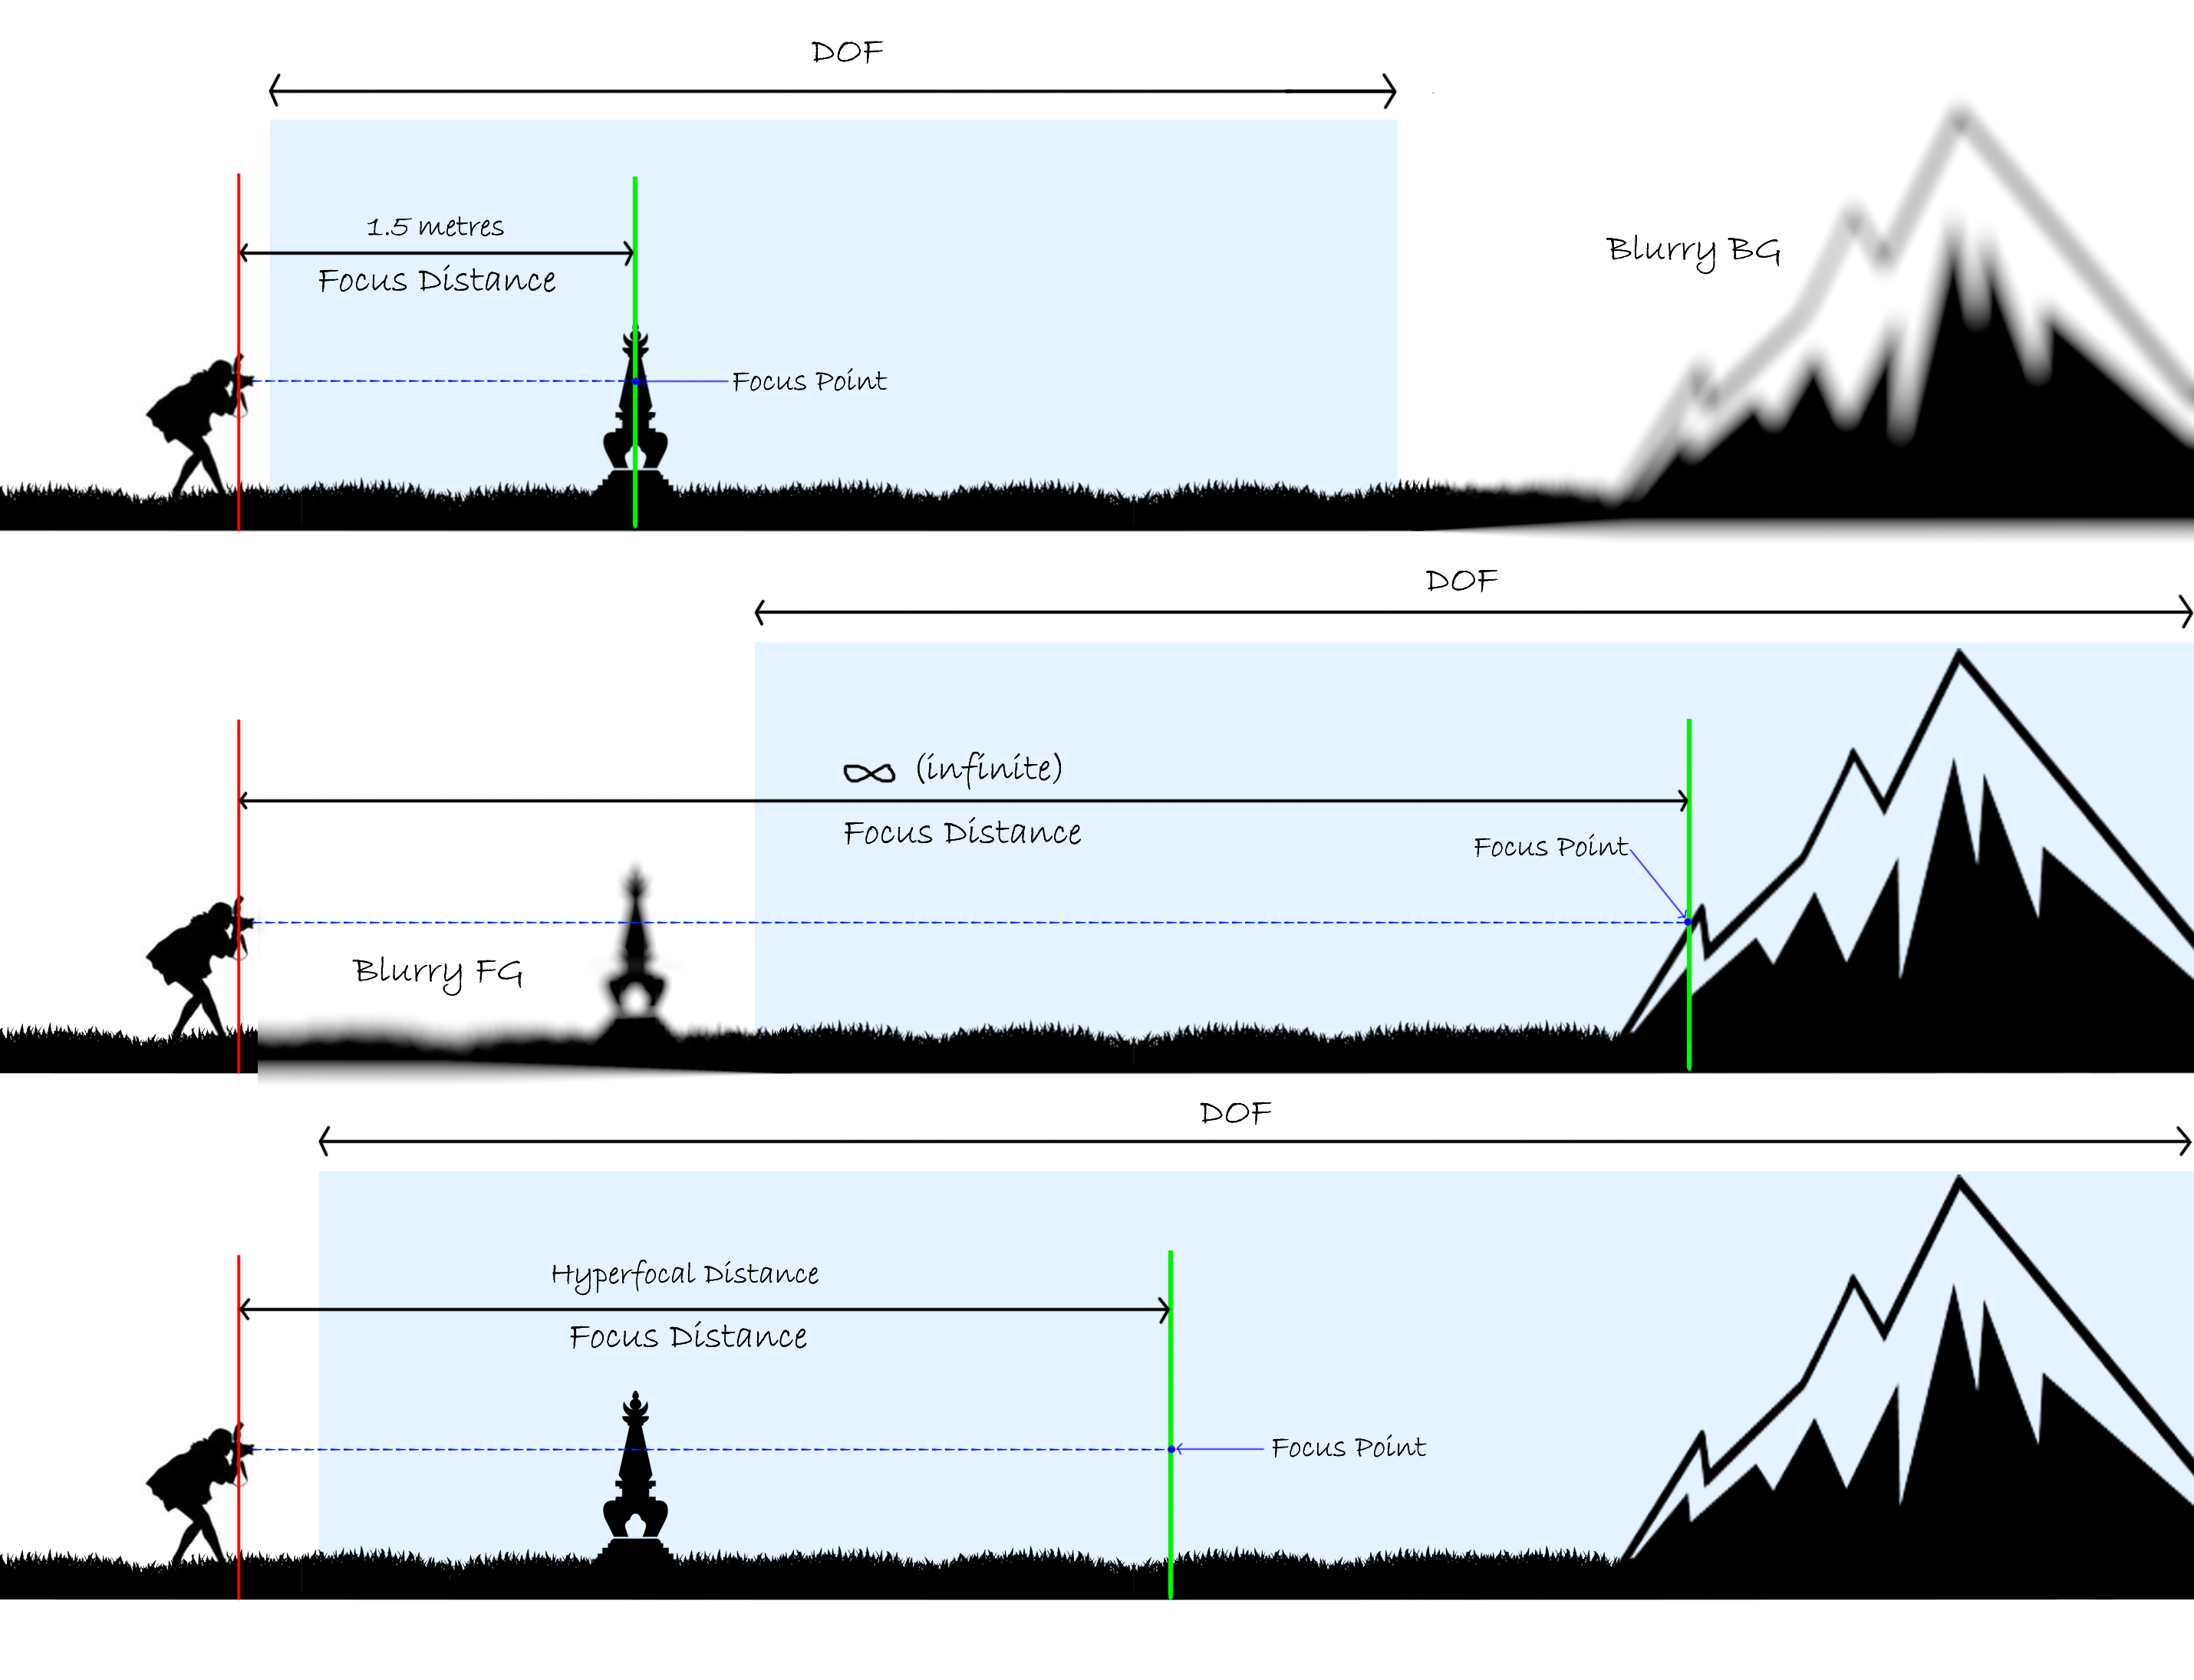
Hyperfocal Distance
All other rules of Depth of Field described above are still applicable in Hyperfocal Distance.
Solution 2: Focus Stacking
Sometimes regardless of which camera settings are used, you will not get every detail of an image that can be captured tack sharp. Even the Hyperfocal distance technique doesn’t guarantee sharpness.
Focus Stacking is a technique used to increase the depth of field in a shot with post-production. It is an intermediate photography technique that combines the use of a camera and post-processing software such as Adobe Photoshop. The technique involves capturing two or more images with different focus points throughout the scene. Later on, these images are blended/merged together where only the sharpest areas of each image are used. This results in an image that has a sharp foreground, middle ground, and background.
There are many tutorials available on youtube.
I am a photographer. Is it necessary to understand all the technical details you have described especially in Defocus Graph?
No, being a photographer it is not necessary to understand all the technical aspects, but if you are a VFX artist like me then it is very important to understand the characteristics of ‘Depth of Field’ and ‘Defocus’. Because being a VFX artist we have to mimic real-world camera simulation in a virtual world with the help of the software.
But, being a photographer, if you gain extra knowledge will definitely give you extra mileage.
What is Bokeh?
Bokeh describes the aesthetic quality of out-of-focus or blurry parts of a photograph, which is why the term is so closely associated with depth of field.
Some people use it to describe how blurry the background is, or how round the out-of-focus balls of light are, but those are just aspects of bokeh; bokeh is the overall quality of the blur in a photograph.
I will describe this topic in more detail in another article.
Conclusion :
To summarize, manipulation of depth of field is a good way to modify the characteristics of your photo, and manipulating the aperture is the ideal way to do this because it has little or no effect on the composition. You simply need to change the shutter speed (or change the light sensitivity – ISO) to compensate for the changes in the exposure from the adjustments to the f-number. Changes in the distance and focal length also affect DOF, but these changes have trade-offs in terms of composition.
By following these tips outlined above, you should now be able to generally control your depth of field to take the images you want. The more you practice and experiment with aperture, distance, and focal length, the more you’ll be able to fine-tune the depth of field in your images to enhance your individual photography style. Then when it comes time to take pictures that really count, you will be ready.